|
Wings3D has very powerful and unique uv mapping capabilities. The
standard mapping types (spherical, planar, etc.) have been replaced
by just two types: projection and unfolding. Compared to other 3D
apps, this may seem like a limitation. After all, the most logical
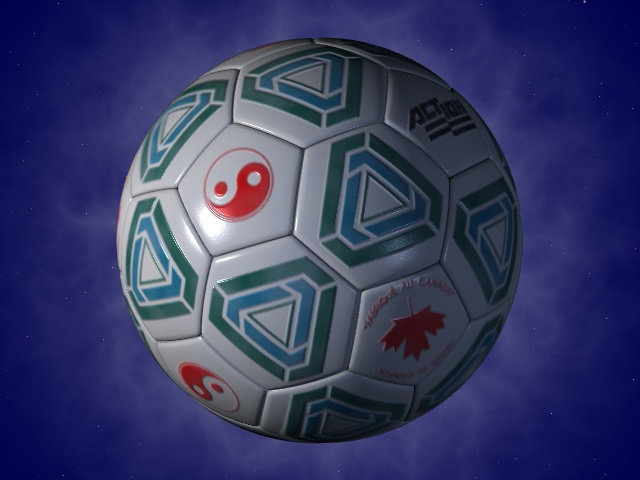
way to wrap an image around a ball is to use spherical mapping.
Blender's spherical mapping, along with a seamless spherical image
map, was used to render my example image and the
results speak for themselves. The problem is that creating such
a map is not easy. So we will use Wings' AutoUV approach to
achieve the same results. Follow the steps below to add UV
coordinates to the soccer ball. Jump to Part 1.
- Let's begin by going back to step 2 of part 1 and making a few
simple changes before extruding the faces. Our goal is to generate
discontinuous and undistorted uv coordinates for each of the 32
panels on the ball. In order to do this with the autouv function,
we must ensure that no two faces that share an edge have the same
material.
- Right click on the Outliner window and create a new material,
name the material "Black," and set the color to black or dark grey.
A neat shortcut is to drag the black box from the emission field to
the diffuse field. Select all 12 pentagons and assign this material
to them by right clicking on "Black" in the Outliner window and
select Assign to Selection.
- Now create a "Red" material (the exact color is not important).
Press 'X' to view along the x-axis and you should see two hexagons
side by side. Select the top left, top right, bottom left, and
bottom right hexagons. Now view along the negative x-axis and
select the 4 hexagons on that side also. Assign the red material to
these 8 faces.
- Now create a "Green" material. There should now be 6 pairs of
faces (with the default grey color) that have not been assigned.
Select one face from each pair and assign the green material to
these 6 faces.
- At this point, all faces that share an edge will have a
different material. Continue with steps 2 through 7 of part 1 and
finish modeling the ball. Note that step 7 has changed slightly due
to a minor modification in the later releases (98% instead of -2%).
- Our pre-segmented model is now ready to receive uv coordinates.
In body mode, select and right click on the object and select
UV Mapping. Right click in the AutoUV window that pops up
and select Continue>Projection. Warning: Do not click
on Segment By! The AutoUV window shows a nice, neat stack
of 20 hexagons and 12 pentagons.
- To clean up the map, right click and select Create
Texture to access the Draw Options Menu. Select
Draw Border Edges, and make sure to
uncheck all of the other options. Click
OK and close the AutoUV window, if you wish.
- Choose File->Export->Wavefront to export the
uv-mapped model to soccer.obj. The accompanying image map, which is
usually named diffuse.tga, will also be exported automatically.
- Open diffuse.tga in your favorite image editing application and
use it as a template to position your smaller images. Create a new
layer and drag/drop or paint your logos over each hexagon and
pentagon as desired. When you are done, delete the background layer
and save your image map. Steps A and B are for PhotoShop users:
- Create a new 80x80 document and use the Marquee tool to
create a red circle. Select all and copy to clipboard. This will
be used as the logo for the hexagons. Select the magic wand tool
(W key) and click anywhere inside a hexagon. Now choose Paste and
the logo will be perfectly centered in the hexagon (pretty neat,
right?). Repeat for the other hexagons and do something similar
for the pentagons.
- Time to clean up the map. In the layers palette, click to
highlight the Background layer. Select all and press Delete to
fill with white. Select Flatten Image and save to (overwrite)
diffuse.tga.
- Now open the Outliner Window in Wings, right click on diffuse
and select Refresh to see your painted map. (This works
only if you still have the soccer mesh loaded and as soon as you
have applied the UV coordinates).
- Start your rendering application, load your object and apply
the image you just created. View the applied map in real-time (if
supported by your app) or do a test rendering and see how your
logos look on the soccer ball's surface.
- You can now apply smoothing (Catmull-Clark Subdivision
Surfaces) and the uv coordinates will be automatically
interpolated.
So now you have a nice uv-mapped soccer ball that is ready to be
lit and rendered. So paint some nice original logos, add some
noise/dirt/grime, finish it off with a subtle application of a bump
map, and you should get professional quality results in no time.
Don't forget to send me the urls of any nice renderings that you
create.
There's an old version in the BMRT section that was done without
modeling the actual geometry; it just uses a single spherical
bump-map. Compare it to this one to see the difference.
This is my first uv-mapping tutorial for Wings, so I would
appreciate any comments or suggestions. And let me know if there
are any errors or omissions.
|